¶ Documentation: Forms in Planning
¶ Overview
This documentation provides instructions for creating and configuring forms in the Planning application. Forms allow users to input, edit, and save data with customizable layouts, field configurations, and validation rules.
¶ Prerequisites
- Access to Planning web application
- Appropriate permissions to create forms
¶ Accessing the Form Builder
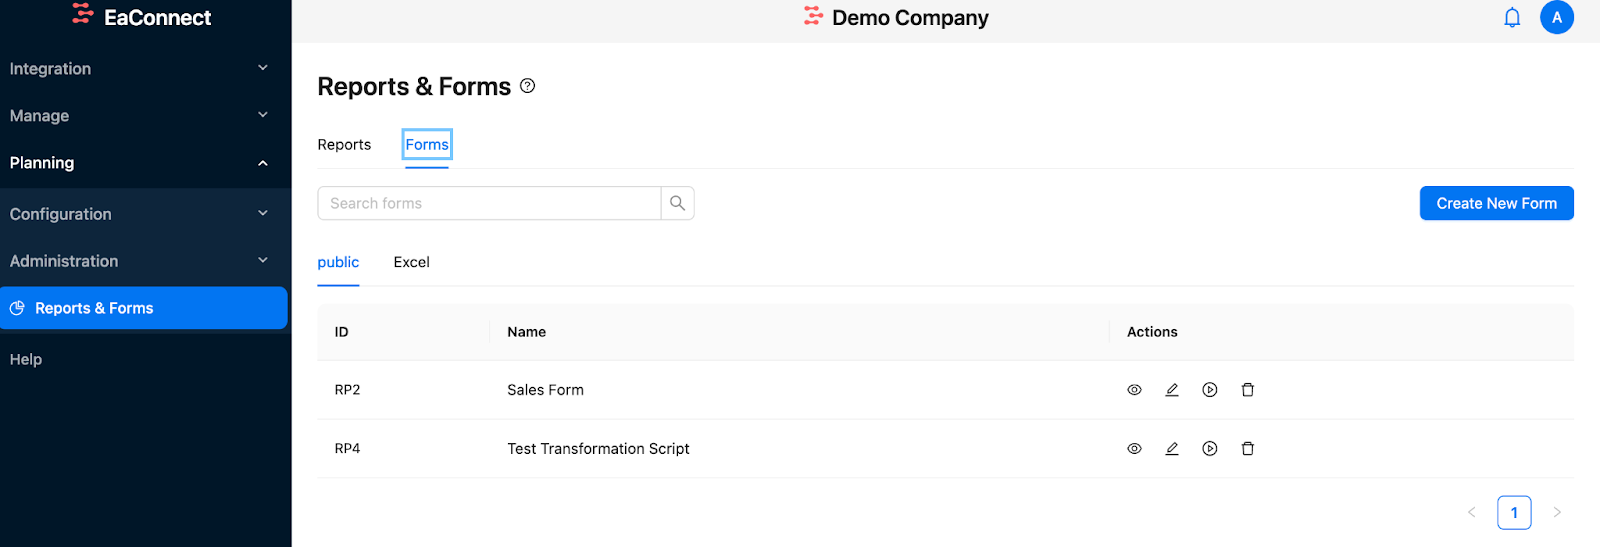
¶ Step 1: Navigate to Reports & Forms
- From the main navigation menu in Planning, click on "Reports & Forms"
- Select the "Forms" tab
- Existing forms will be displayed with their ID and Name
- Click the "Create New Form" button in the upper-right corner to open the Form Builder
¶ Creating a New Form
¶ Step 1: Basic Form Configuration
- Form Name: Enter a descriptive name for your form
- Select Team: Choose a team from the dropdown menu
- The form will be accessible only to users who are members of this team
- You'll only see teams for which you have admin privileges

¶ Step 2: Configure Data Source Settings
- Data Source Type: Select the type of data source you want to use
- Options include: Cube, Table, Dimension, View, etc.
- Select Model: Choose the model that contains your data
- Data Source: Select the specific table or view to build your form
- Link Report/Form (Optional): Link to other reports or forms for navigation
- This enables users to navigate to related reports or forms from the current form
- Transformation Script: Select a transformation script from the dropdown
- This script will execute when form data is saved
- Can be used for data validation, calculations, or transformations
- For more details, refer to the "Transformation Script Documentation"
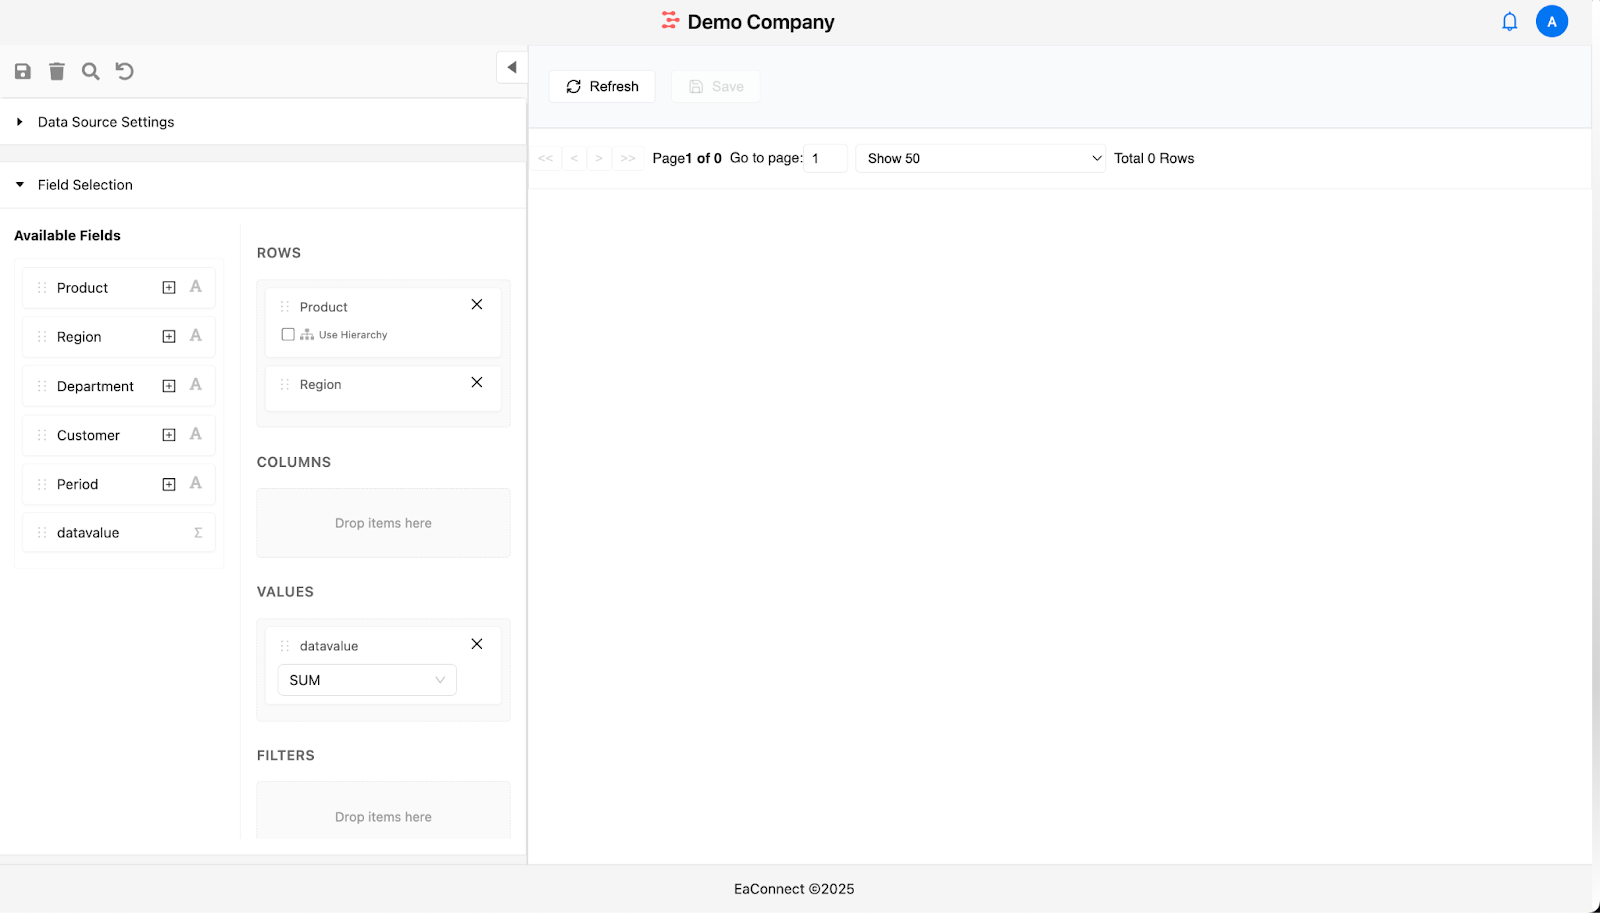
¶ Step 3: Field Selection
Available Fields: After selecting your data source, available columns will appear in the "Available Fields" section
Organize these fields into different areas of your form:
- Rows: Fields that will be displayed as rows
- Columns: Fields that will be displayed as columns
- Values: Measures or values that will be editable
- Filters: Fields that will be used for filtering the form data
To add fields to these areas:
- Drag and drop fields from "Available Fields" to the desired area
- Right-click on a field and select which area to move it to
¶ Step 4: Field Configurations
The Field Configurations section allows you to set up each field's editing properties:
For numeric value fields:
- Editable: Toggle whether users can edit these values in the form
- Value Range: Set minimum and maximum values allowed for this field
For text/dimension fields:
- Editable: Toggle whether users can edit these values in the form
- Value Type: When editable, choose between:
- Free Text: Users can enter any text
- Enum Values: Users must select from predefined values
- Link to Dimension: Users must select from values in a dimension
These configurations will apply whenever users are editing form data.
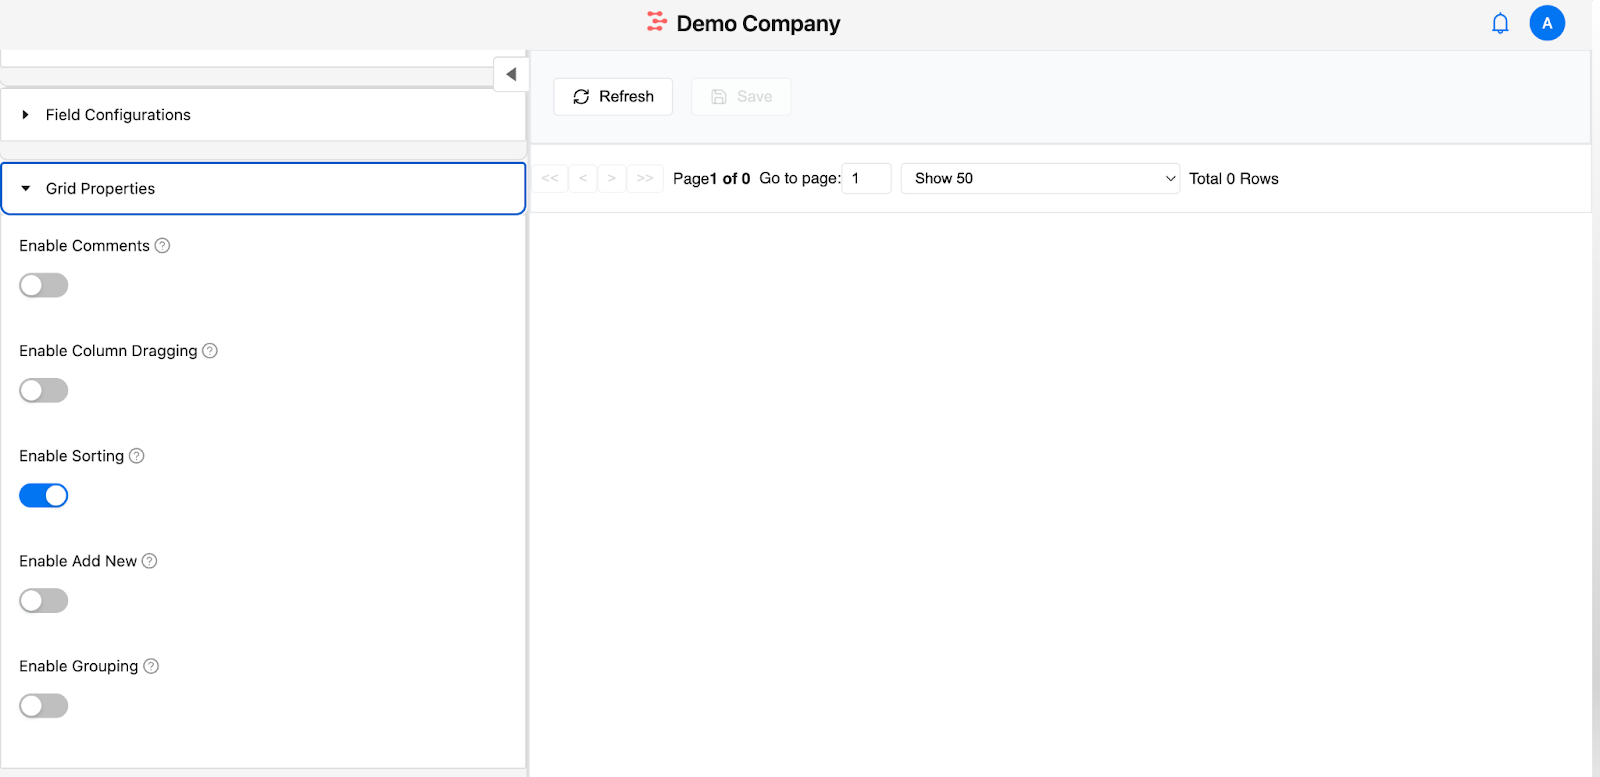
¶ Step 5: Grid Properties
Configure how users will interact with the form:
- Enable Comments: Allow users to add comments at the row level
- Comments will be visible to all users with access to the form
- Enable Column Dragging: Allow users to rearrange columns
- Enable Sorting: Allow users to sort the form by different columns
- Enable Add New: Allow users to add new records directly in the form
- This is a key difference from reports - it enables data entry of new records
- Enable Grouping: Allow users to group data by specific criteria
¶ Step 6: New Record Configurations
If you've enabled adding new records, configure how new records will be created:
For dimension fields (rows/columns):
- Value Type for New Records: Choose between:
- Free Text: Allow users to enter any text values
- Enum Values: Restrict users to selecting from predefined values
- Link to Dimension: Users must select from values in a dimension
- Select Dimension for New Records: When using "Link to Dimension," select the appropriate dimension to link to
For numeric value fields:
- Value Range for New Records: Set minimum and maximum values allowed for new records

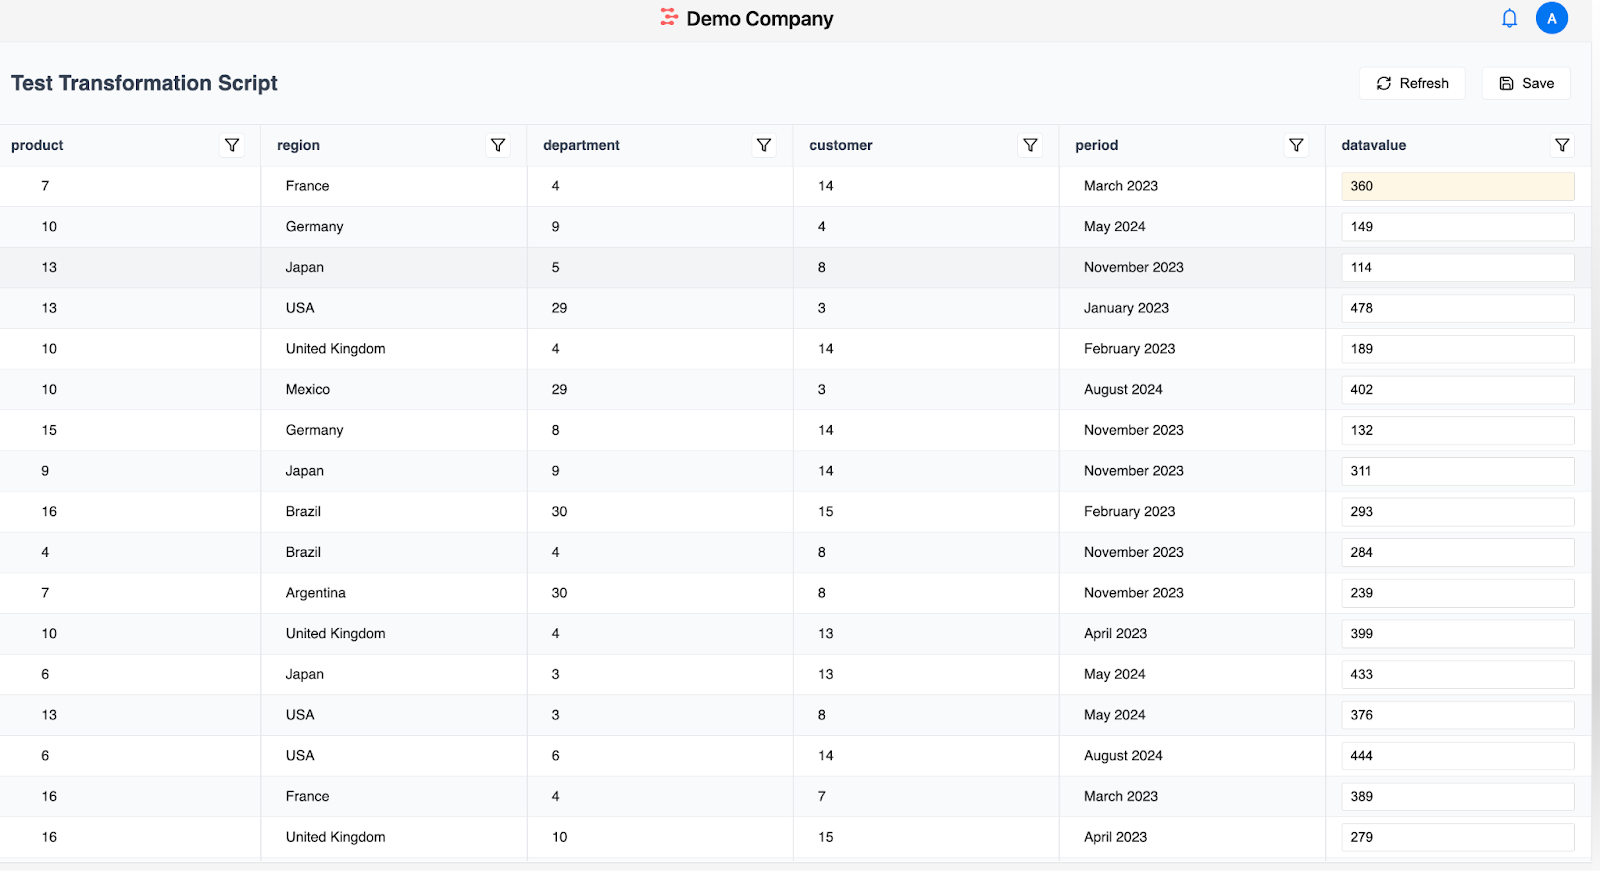
¶ Step 7: Save and Test Your Form
- You can click the refresh icon to preview the form layout with data.
- Once you've configured your form, click "Save" icon to create the form
- The form will now be available in the Forms list
- Users within the selected team can access and use the form
- Test your form by adding new records and editing existing ones to ensure all configurations work as expected
¶ Using Forms
¶ Accessing Forms
- Navigate to "Reports & Forms" section
- Select the "Forms" tab
- Click on the form ‘Open Form’ icon you want to open
¶ Working with Form Data
- View Data: Browse existing records in the form
- Edit Data: If fields are configured as editable:
- Click on a cell to edit its value
- Values will be validated according to your field configurations
- Add New Records: If "Enable Add New" is turned on:
- Click the "Add New" button
- Fill in the required information based on the New Record Configurations
- New records will be saved to the data source
- Save Changes: After editing or adding records, click "Save"
- Any configured Transformation Script will execute during the save process
¶ Other Form Features
- Refresh: Update the form with the latest data
- Filter: Use the filter icons to narrow down displayed data
- Sort: If enabled, click on column headers to sort data
- Group: If enabled, drag fields to group data
- Comments: If enabled, add comments to specific records