¶ Dimension Management in EaConnect
This guide provides detailed instructions for creating and managing dimensions in the EaConnect platform. Dimensions are fundamental data structures that help organize and categorize your information.
¶ Overview
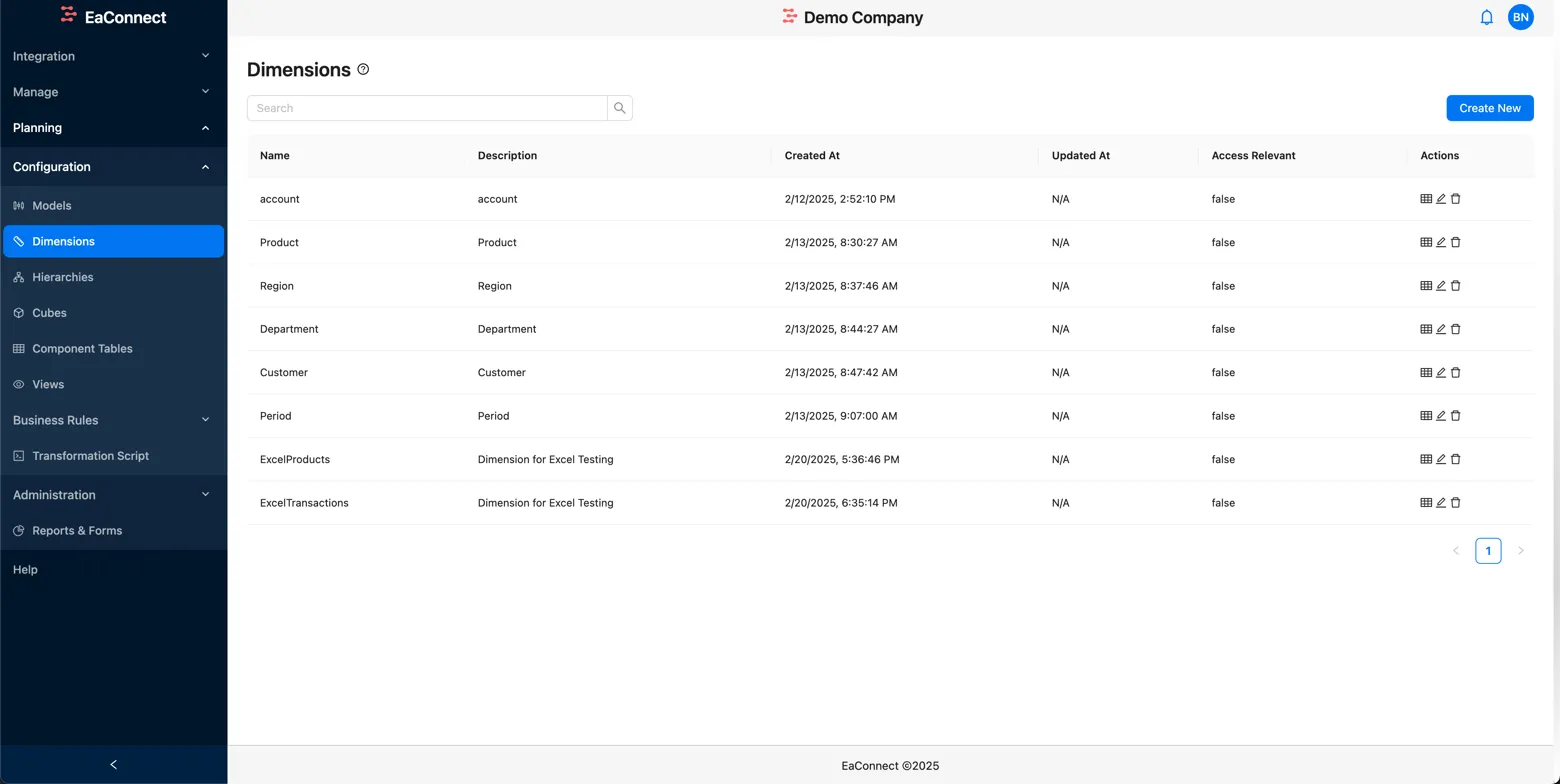
Dimensions in EaConnect represent core business entities such as accounts, products, regions, departments, and time periods. They support data access control and can be referenced by other components in the system like models, cubes, and component tables.
¶ Accessing Dimensions
- Navigate to the left sidebar menu
- Expand the "Configuration" section if needed
- Click on "Dimensions"
¶ Creating Dimensions
There are two ways to create dimensions in EaConnect:
- Create Manually: Define the dimension structure field by field
- Create from CSV: Import the dimension structure from a CSV file
¶ Method 1: Create Dimension Manually
- Navigate to the Dimensions page
- Click the "Create New" button in the top-right corner
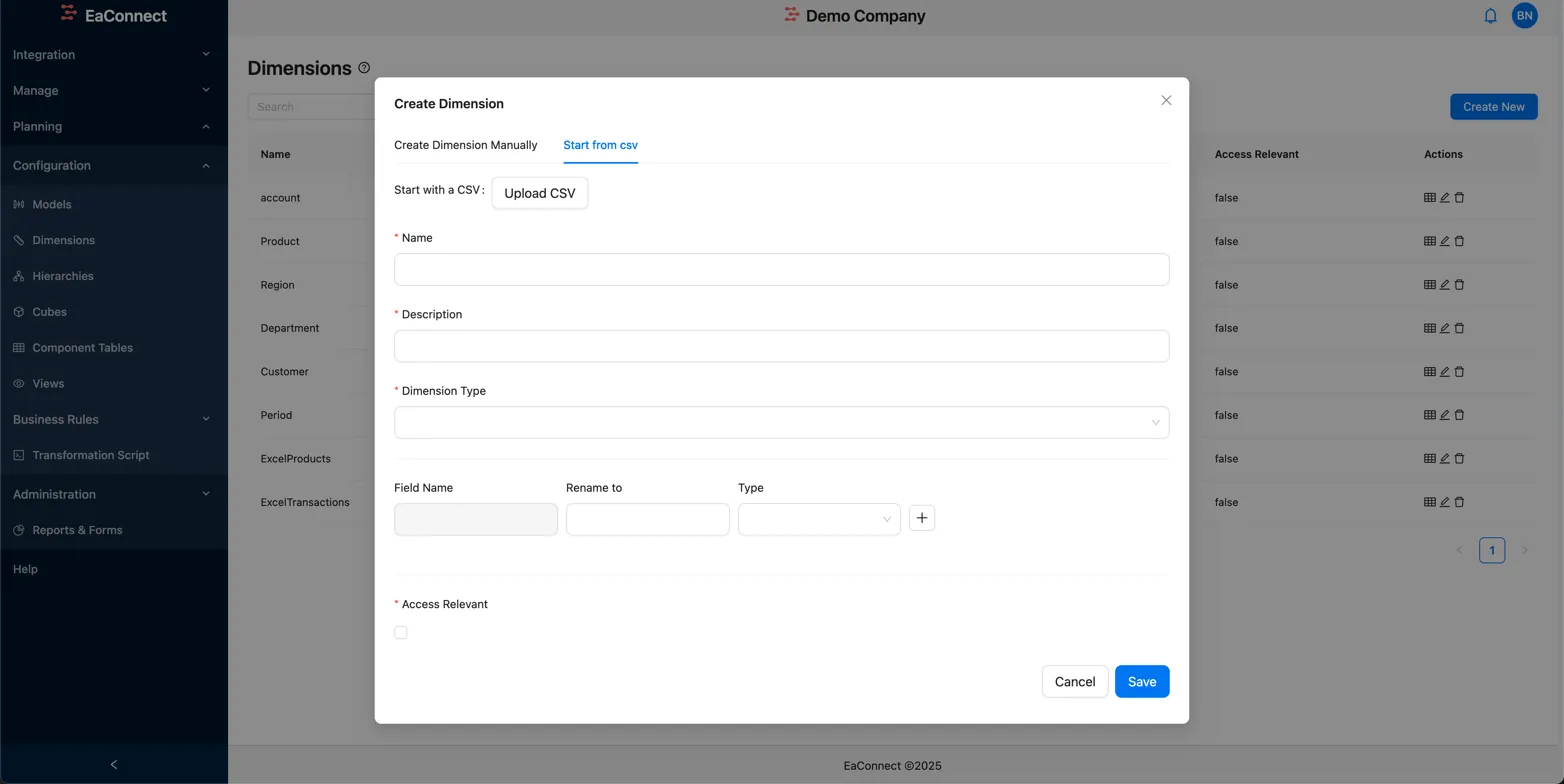
- Select the "Create Dimension Manually" tab

¶ Required Information:
- Name: Enter a unique alphanumeric name (only letters, numbers, and underscores allowed)
- Description: Provide a clear description of the dimension's purpose
- Dimension Type: Select from:
- Generic (standard dimension)
- Account (financial accounts)
- Time (date/time periods)
- Version (for versioning support)
- Schema: Define the fields for this dimension:
- Field Name: Column name
- Type: Data type (varchar, int, float, boolean, timestamp, json)
- Use the "+" button to add additional fields
¶ Advanced Options:
- Access Relevant: Check this box if this dimension should be used for data access control
¶ Complete Creation:
- Click "Save" to create the dimension
- The new dimension will appear in the dimensions list
¶ Method 2: Create Dimension from CSV
- Navigate to the Dimensions page
- Click the "Create New" button in the top-right corner
- Select the "Start from csv" tab
¶ Step 1: Upload CSV File
- Click the "Upload CSV" button to select your CSV file
- The system will automatically analyze the CSV structure and detect column data types
¶ Step 2: Configure Dimension Properties
- Name: Enter a unique alphanumeric name
- Description: Provide a clear description
- Dimension Type: Select the appropriate type
¶ Step 3: Configure Schema
The system will automatically populate this section based on your CSV:
- Field Name: Original column names from the CSV (read-only)
- Rename to: Optionally provide new names for the fields
- Type: Data type of each field (can be modified if needed)
¶ Step 4: Set Options
- Access Relevant: Check if this dimension should be used for data access control
¶ Complete Creation:
- Click "Save" to create the dimension
- Data from your CSV will be loaded into the dimension
¶ Managing Dimensions
¶ Viewing Dimension Data
- From the Dimensions list, locate your dimension
- Click the table icon in the "Actions" column
- This will open the data preview screen where you can see all records
¶ Editing Dimensions
- From the Dimensions list, locate your dimension
- Click the pencil icon in the "Actions" column
- Make your changes in the edit form
- Click "Update" to save changes
¶ Deleting Dimensions
- From the Dimensions list, locate your dimension
- Click the trash icon in the "Actions" column
- Confirm deletion when prompted
Warning: Deleting a dimension will remove all its data and may impact associated models, cubes, and other components that reference it.
¶ Access Relevance
When a dimension is marked as "Access Relevant," it can be used in data access rules to control which users can see specific data. For example:
- A "Region" dimension marked as access relevant could be used to restrict users to only see data for their assigned regions
- An "Account" dimension could limit financial visibility based on user roles
Use this feature carefully as it impacts system security and data visibility.