EA Connect - Anaplan On Demand Documentation
This documentation provides an overview of executing flows from Anaplan in EA Connect. The integration allows you to trigger the execution of Anaplan flows and upload the results back to Anaplan.
¶ Prerequisites
Before performing the Anaplan integration in EA Connect, ensure the following prerequisites are met:
- Anaplan Account: Obtain valid credentials for accessing your Anaplan account.
- Anaplan Model and Workspace: Identify the specific Anaplan model and workspace that you will be working with.
- Anaplan Integration Settings: Ensure that the necessary integration settings are configured within your Anaplan account to enable API access and flow exports.
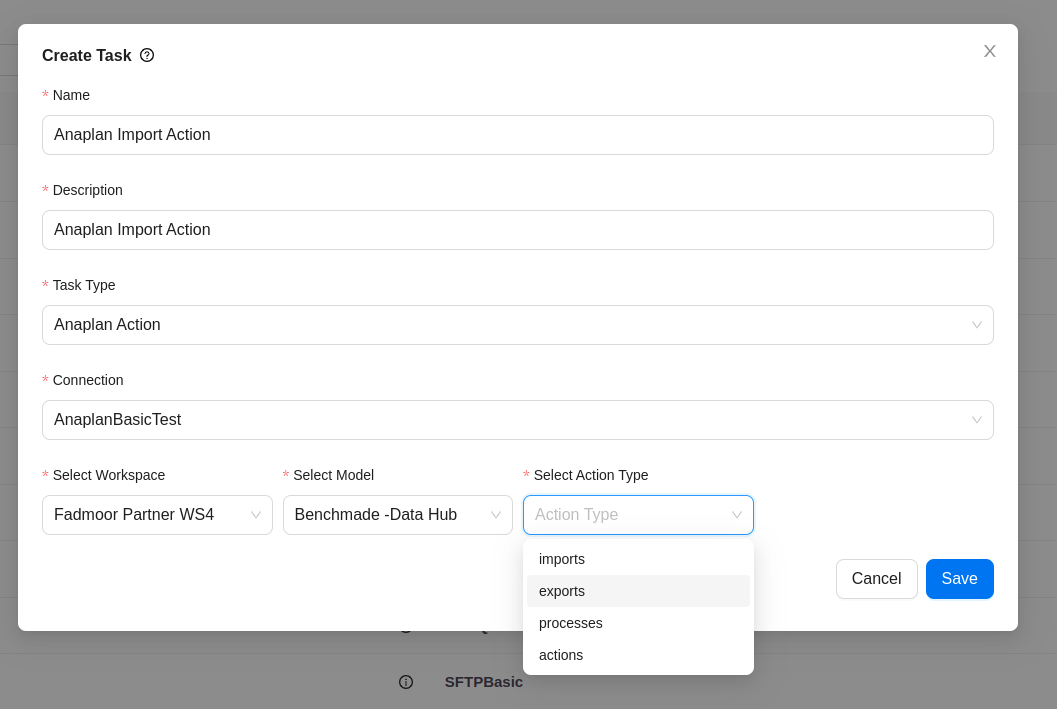
¶ Task 1: Anaplan Export
The first task, "Anaplan Export," is used to prepare the file that needs to be exported from Anaplan. Follow these steps to create the task:
1.In the EA Connect web application, navigate to the "Build" menu.
2.Select the "Tasks" submenu.
3. Click on the "Create New" button.

4. Enter the name and description. Select Task type ‘Anaplan Action’ from the dropdown, Select the Anaplan Connection.

5. Once the action type is selected, select the workspace from ‘Select Workspace' dropdown.

6. Select the model from ‘Select Model’ dropdown.

7.Select the ‘exports’ action from ‘Select Action Type’ dropdown.
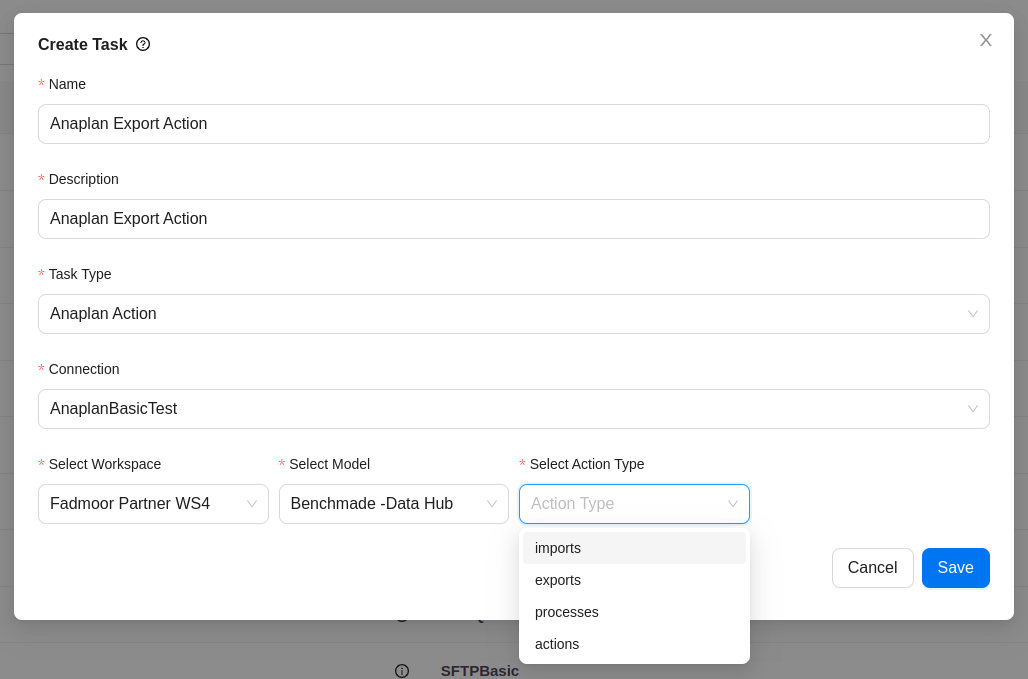
8.Select the file that need to be export from ‘Select Option’ dropdown.

9. Click on ‘Save’ button to save the task configuration.
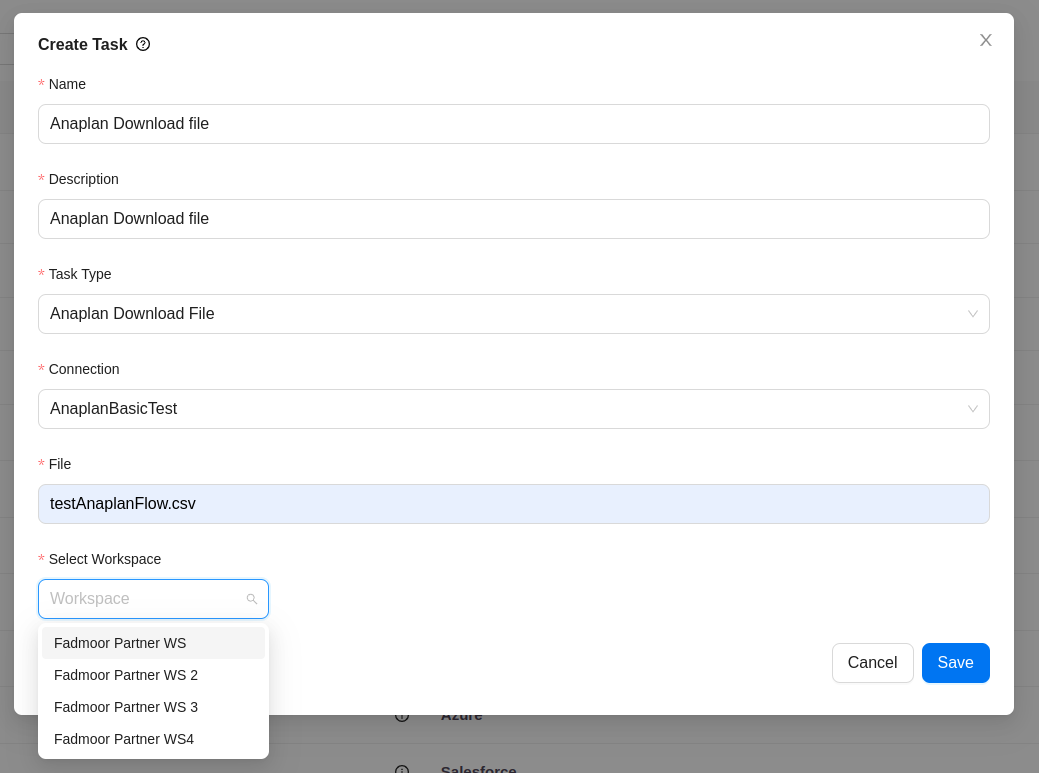
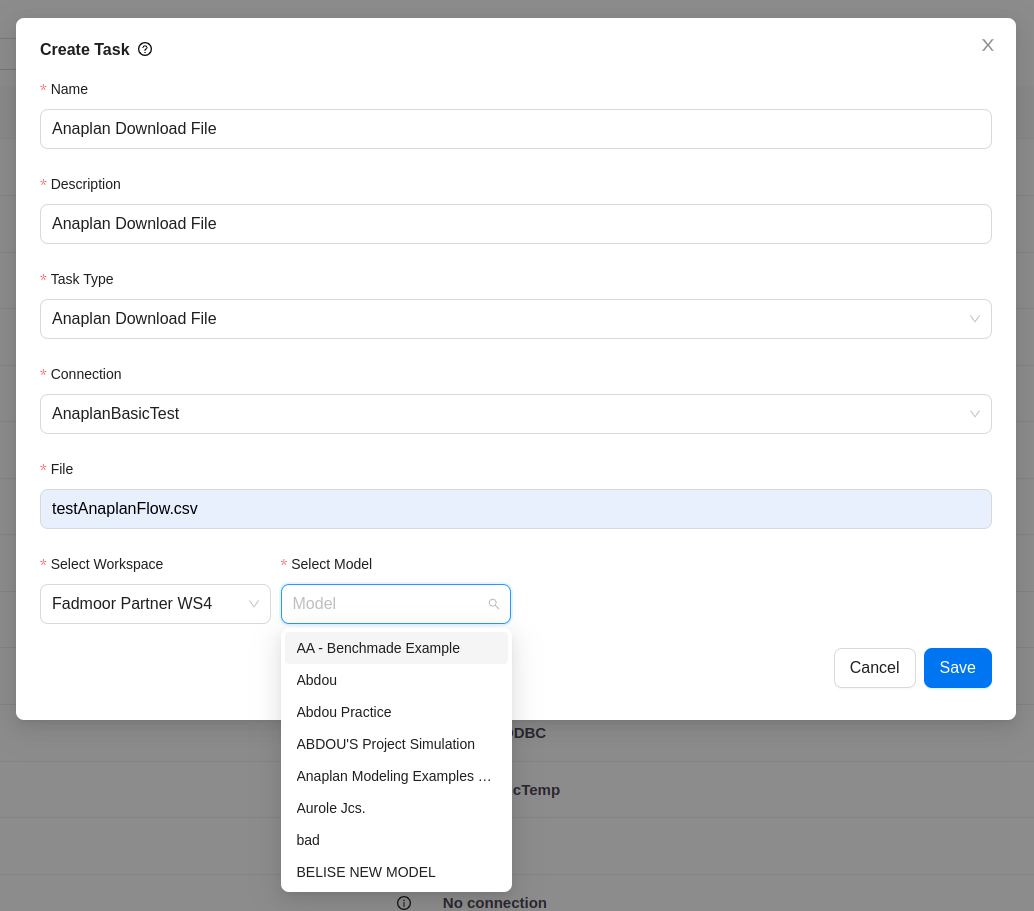
¶ Task 2: Anaplan Download
The second task, "Anaplan Download," is used to download the file from Anaplan. Follow these steps to create the task:
1.In the EA Connect web application, navigate to the "Build" menu.
2.Select the "Tasks" submenu.
3. Click on the "Create New" button.
4.Provide a suitable name and description for the task to identify it in the future.. Select Task type ‘Anaplan Download’ from the dropdown, Select the Anaplan Connection.

5. Enter the output file name in ‘File’ filed.
6. Once the action type is selected, select the workspace from ‘Select Workspace' dropdown.
7. Select the model from ‘Select Model’ dropdown.
8.Select the file that need to be download from ‘Select Option’ dropdown.
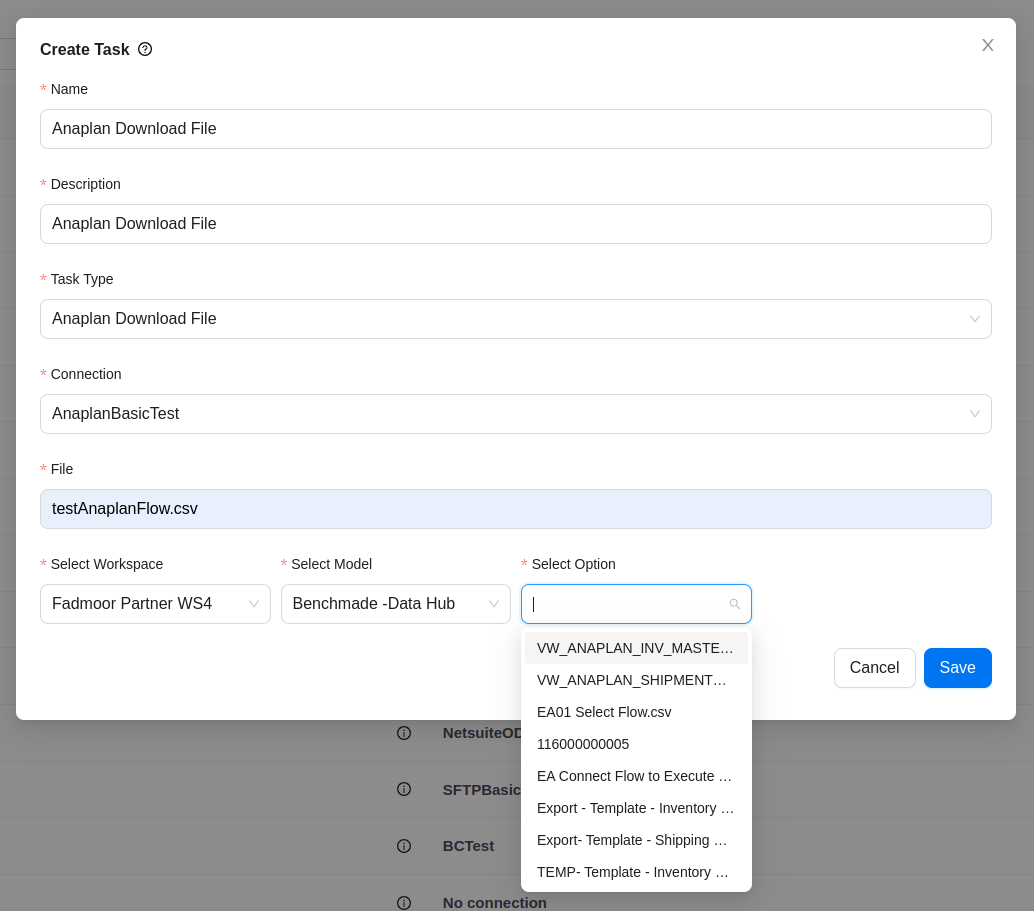
9. Click on ‘Save’ button to save the task configuration.
¶ Task 3: Save Anaplan Trigger Flow
The third task, "Save Anaplan Trigger Flow," is used to save the Anaplan flow list in EA Connect. This task helps trigger the execution and uploading of the flow back to Anaplan. Follow these steps to create the task:
1.In the EA Connect web application, navigate to the "Build" menu.
2.Select the "Tasks" submenu.
3. Click on the "Create New" button.
4.Provide a suitable name and description for the task to identify it in the future.
5.Choose the "Save Anaplan Trigger Flow" task type, Select the Anaplan Connection.

6. Select the file that you've downloaded from anaplan in EA Connect.

7. Click on ‘Save’ button to save the task configuration.
¶ Creating the Flow for downloading the file and saving it in Ea Connect
Once the three tasks are created, you can create a flow that combines these tasks in the desired order. Follow these steps:
1.In the EA Connect web application, navigate to the "Build" menu.
2.Select the "Flows" submenu.
3.Click on the "Create New" button.

4.Provide a suitable name and description for the flow to identify it in the future.

5.Select the flow group for the flow.

6.Click on 'Add Task' button and select the three tasks created earlier onto the flow canvas in this order: Anaplan Export, Anaplan Download, Save Anaplan Trigger Flow.
7.Now click on ‘Ok’ button.

8.Save the flow configuration.
¶ Task 4: Execute Anaplan Trigger Flow
The "Execute Anaplan Trigger Flow" task is used to execute the Anaplan flow that was downloaded and saved in EA Connect. This task triggers the execution process of the flow. Follow these steps to create the task:
- In the EA Connect web application, navigate to the "Build" menu.
- Select the "Tasks" submenu.
- Click on the "Create New" button.
- Provide a suitable name and description for the task to identify it in the future.
- Choose the "Execute Anaplan Trigger Flow" task type.

6. Enter file name that need to be upload to Anaplan in ‘Output File Name’ field. Note: Output file name should be different from Anaplan Downlad file.
7. Click on the "Save" button to save the task configuration.
¶ Task 5: Anaplan Upload
The "Anaplan Upload" task is used to upload the file back to Anaplan. This task ensures that the updated data is reflected in the Anaplan model. Follow these steps to create the task:
1. In the EA Connect web application, navigate to the "Build" menu.
2. Select the "Tasks" submenu.
3. Click on the "Create New" button.
4. Provide a suitable name and description for the task to identify it in the future.
5. Choose the "Anaplan Upload" task type.
6. Select the Anaplan Connection.

7. Select the file that needs to be uploaded back to Anaplan. Note: The file name should be same as the output file name in ‘Execute Anaplan Trigger Flow’ task.

8. Select the workspace from ‘Select Workspace' dropdown.

9.Now, select the model from ‘Select Model' dropdown.

10. Select the target file from ‘Select Option’ dropdown.
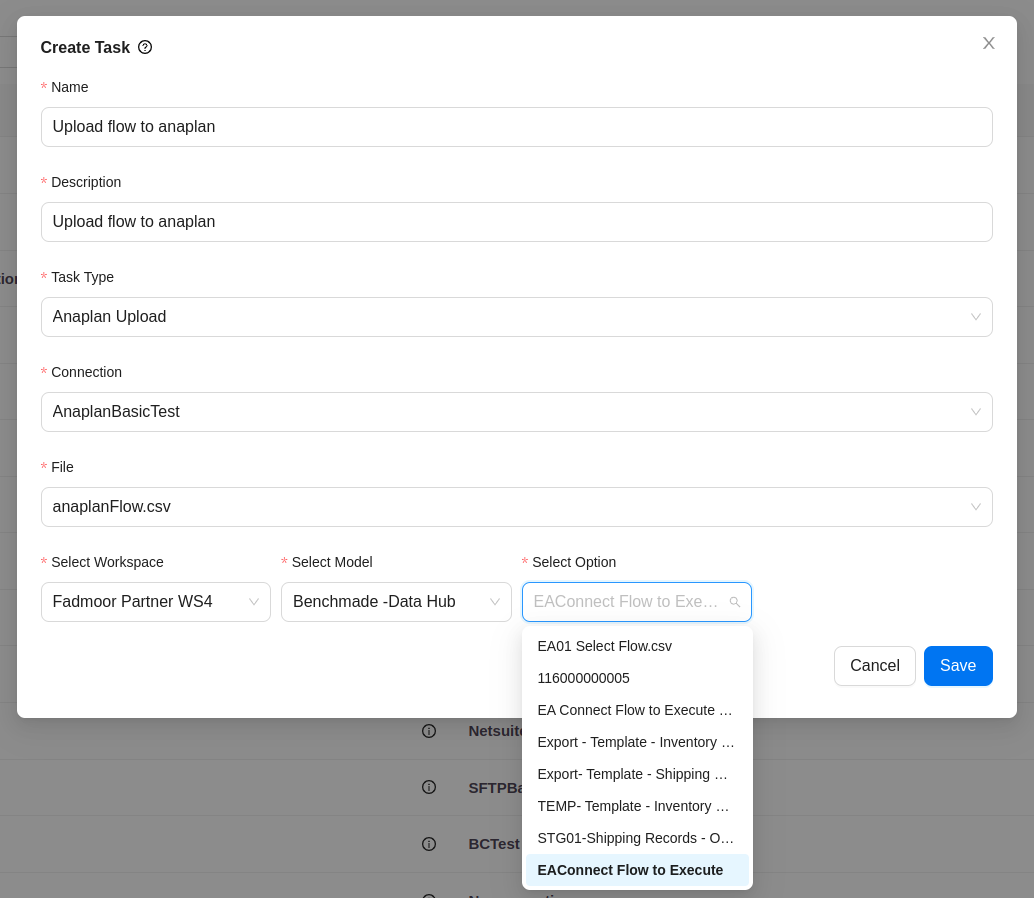
11.Click on the "Save" button to save the task configuration.
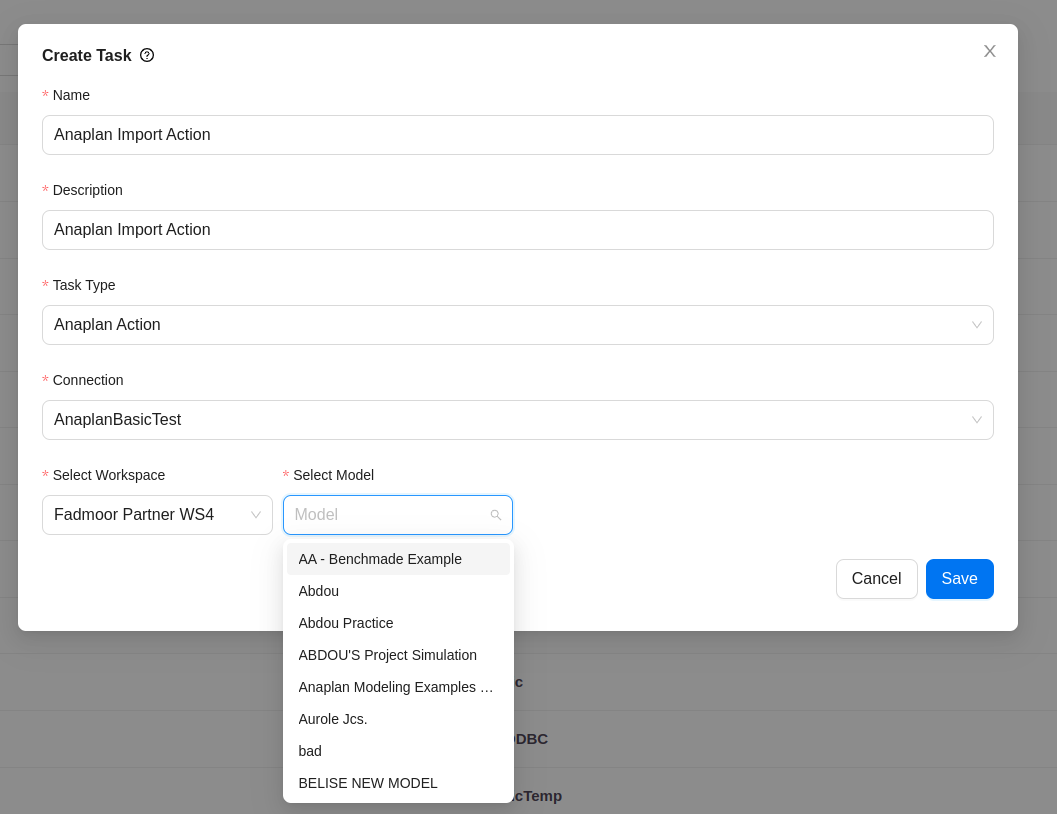
¶ Task 6: Anaplan Import
The "Anaplan Import" task is used to import the uploaded file into the respective Anaplan model and workspace. This task ensures that the data is correctly imported and processed by Anaplan. Follow these steps to create the task:
1.In the EA Connect web application, navigate to the "Build" menu.
2.Select the "Tasks" submenu.
3.Click on the "Create New" button.
4.Provide a suitable name and description for the task to identify it in the future.
5.Choose the "Anaplan Import" task type.And select the Anaplan Connection.

6. Once the action type is selected, select the workspace from ‘Select Workspace' dropdown.

7. Select the model from ‘Select Model’ dropdown.
8. Select the ‘imports’ action from ‘Select Action Type’ dropdown.
9.Select the targeted file from ‘Select Option’ dropdown.

10. Click on ‘Save’ button to save the task configuration.
¶ Creating the Flow for Uploading to Anaplan
Once the three tasks are created, you can create a new flow to execute the tasks in the desired order. Follow these steps:
1.In the EA Connect web application, navigate to the "Build" menu.
2.Select the "Flows" submenu.
3.Click on the "Create New" button.
4.Provide a suitable name and description for the flow to identify it in the future.
5.Select the flow group for the flow.

6.Click on 'Add Task' button and select the three tasks created earlier onto the flow canvas in this order: Execute Anaplan Trigger Flow, Anaplan Upload, Anaplan Import.

7.Now click on ‘Ok’ button.
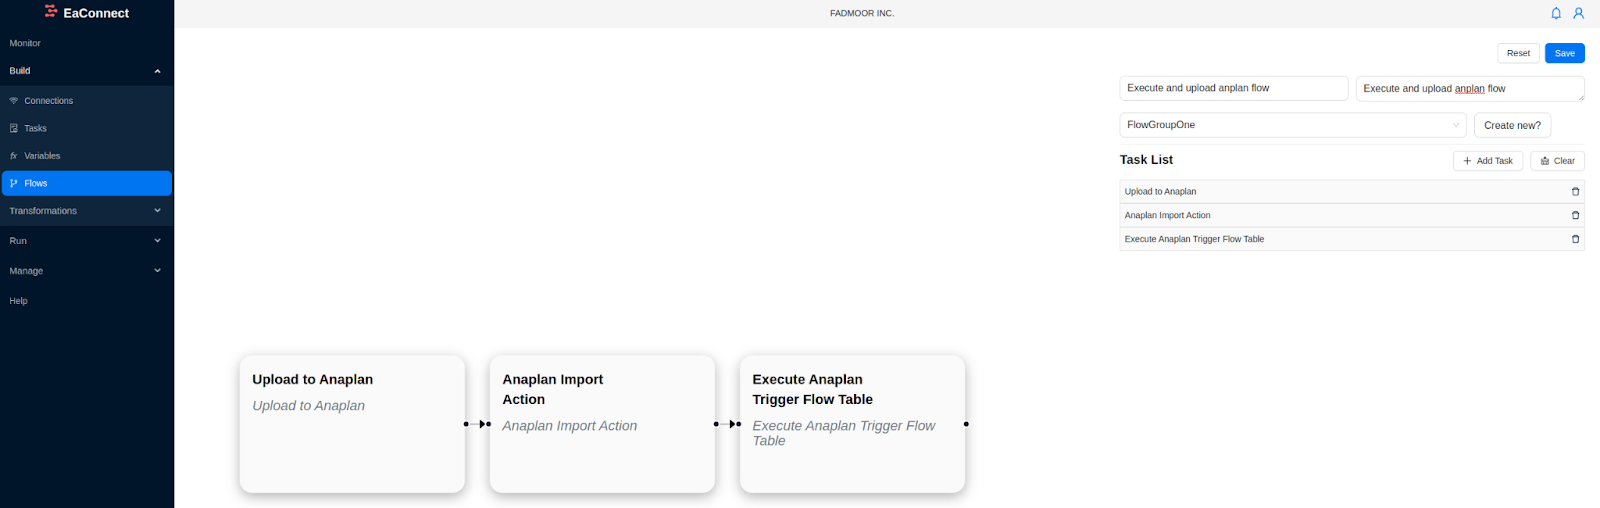
8.Save the flow configuration.
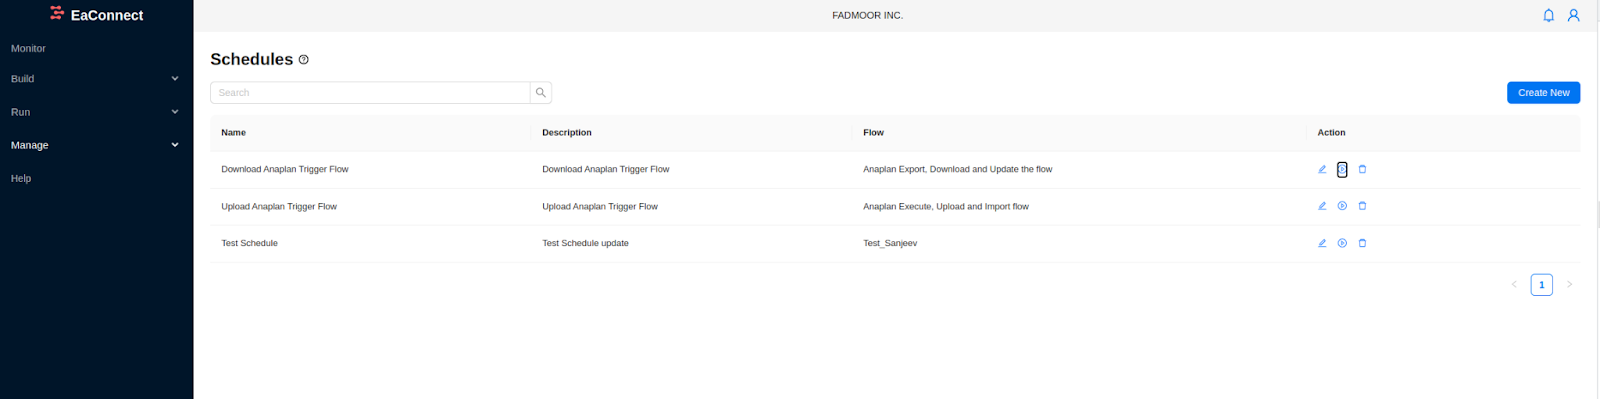
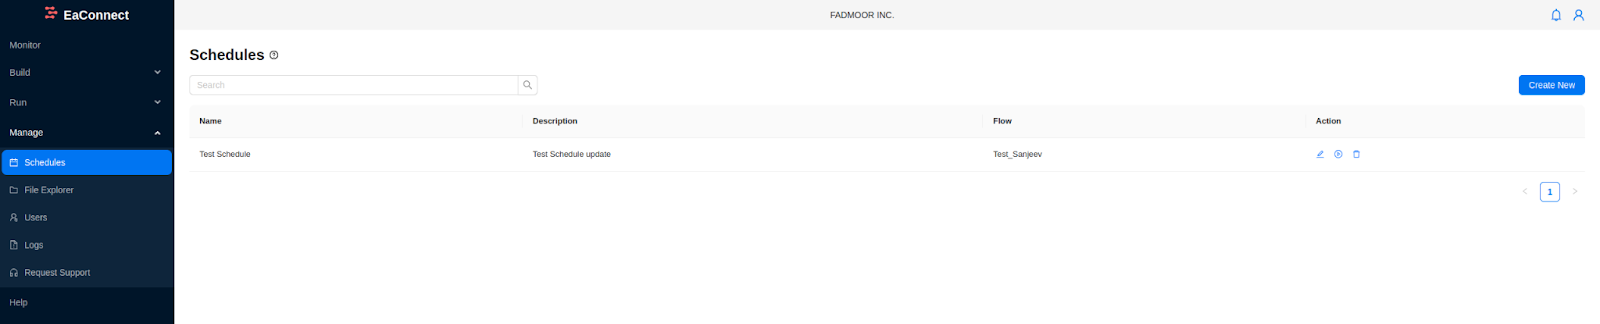
¶ Creating schedules in EA Connect
To automate the execution of flows in EA Connect, you can create schedules that define when and how frequently a flow should run. Schedules allow you to set up recurring executions of your flows without manual intervention.
Create a schedule for ‘Anaplan download file and save’ flow to downloading the file and saving it in Ea Connect:
Follow these steps to create a new schedule in EA Connect:
1. In the EA Connect web application, navigate to the "Manage" menu.
2. Select the "Schedules" submenu.
3. Click on the "Create New" button.
4. Provide a suitable name and description for the schedule to identify it in the future.
5. Select the ‘Anaplan download file and save’ from the "Select Flow" dropdown. This is the flow that will be executed according to the schedule.

6.Specify the cron pattern for defining the schedule frequency. The cron pattern allows you to set the schedule to run at specific intervals, such as daily, weekly, or monthly.
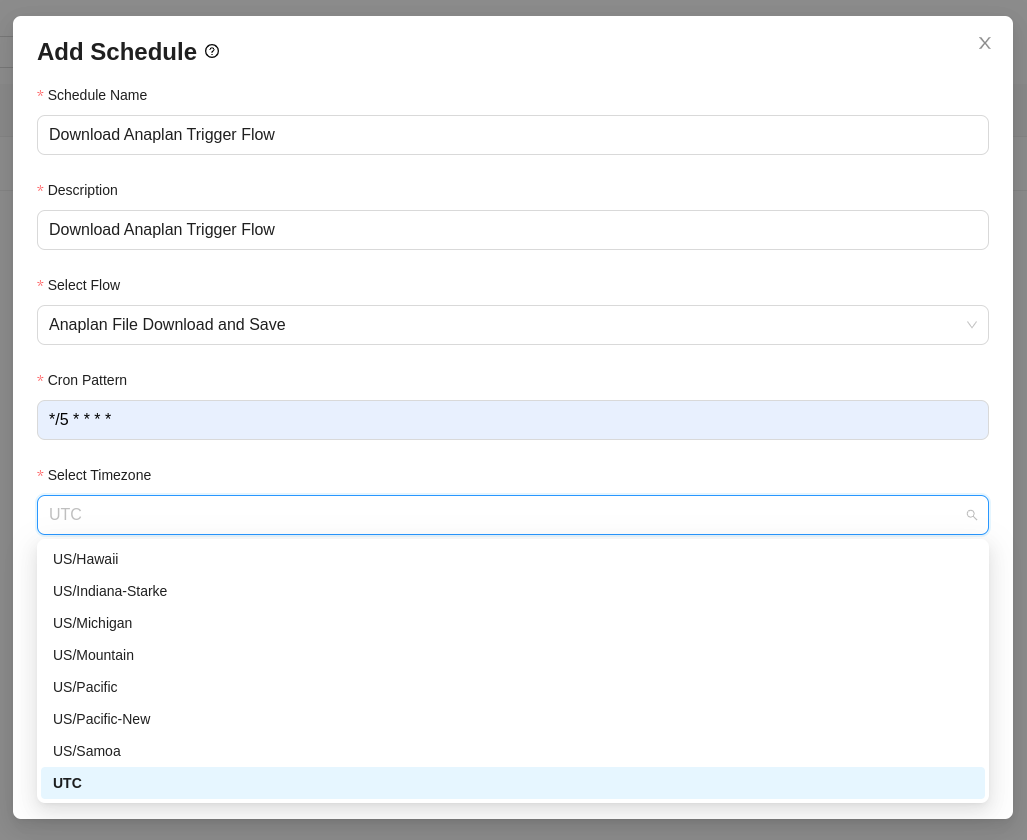
7.Select the desired timezone for the schedule. This ensures that the flow executes according to the specified timezone.
8.Optionally, you can enter an email address in the "Error Email" field if you want to receive notifications in case of any errors during the schedule execution. This email will be notified in case of any errors encountered during the schedule execution.
9.Optionally, you can also enter an email address in the "Success Email" field to receive notifications when the schedule execution completes successfully.

10. Click on the "Save" button to save the schedule configuration.
Similarly, create a schedule for ‘Execute and upload anaplan’ flow to upload the file and saving it in Anaplan:
Follow these steps to create a new schedule in EA Connect:
1. In the EA Connect web application, navigate to the "Manage" menu.
2. Select the "Schedules" submenu.
3. Click on the "Create New" button.
4. Provide a suitable name and description for the schedule to identify it in the future.
5. Select the ‘Execute and upload anaplan’ from the "Select Flow" dropdown. This is the flow that will be executed according to the schedule.
6.Specify the cron pattern for defining the schedule frequency. The cron pattern allows you to set the schedule to run at specific intervals, such as daily, weekly, or monthly.
7.Select the desired timezone for the schedule. This ensures that the flow executes according to the specified timezone.
8.Optionally, you can enter an email address in the "Error Email" field if you want to receive notifications in case of any errors during the schedule execution. This email will be notified in case of any errors encountered during the schedule execution.
9.Optionally, you can also enter an email address in the "Success Email" field to receive notifications when the schedule execution completes successfully.

10. Click on the "Save" button to save the schedule configuration.
¶ Starting the Schedules:
Once you have created a schedule, you can run it as needed. Follow these steps to run your schedules:
- In the EA Connect web application, navigate to the "Manage" menu.
- Select the "Schedules" submenu.
- You will see a list of all the created schedules.
- Click on ‘Start’ icon under the action column for both the flows.